


 NEWS
NEWS
With the Finndurarth miniatures tucked away in Collectors’ and Emperor’s Editions on their way to their new owners as I’m writing these lines, I thought it would be prudent of us to write a bit of a painting guide. Well, two painting guides, to be exact. The first one uses some relatively advanced techniques while the latter goes for a sharper, more “box-art” style. The guides were written with the assumption that they will be used by hobbyists, so the techniques are listed along with the paints we used but not explained in detail. Luckily, the internet is chock-full of all sorts of guides; you can even learn about beginner techniques fairly easily should you wish to paint your mini without previous experience.
The guides are not all-encompassing, and naturally, you can add steps to where you want to give more detail to something, mix and match steps from the two guides, or otherwise tweak them to your liking. This is what makes this hobby great after all!
On the Paints Used
For most of the steps, we used a lot of Games Workshop (GW) products because they are easily obtainable for the most part and we have a ton on hand because we paint quite a lot of Warhammer. That said, we are in no way sponsored by Games Workshop (nor any other company), and you are absolutely encouraged to use other miniature painting products if you wish. Only make sure that the type of paint is the same as the one in the guide (primer for priming, layer paint for layering, etc.).
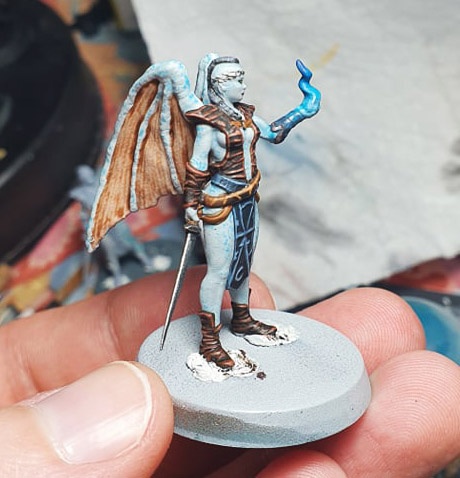
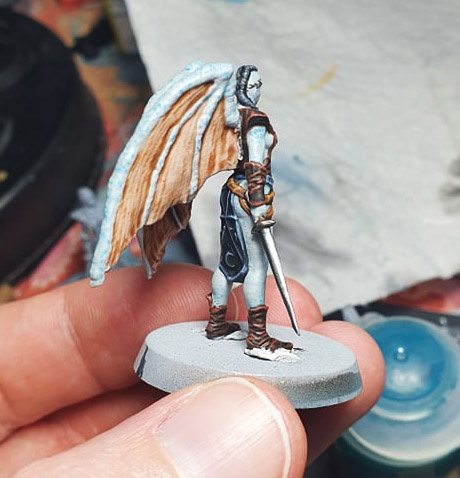
Method 1: Going Organic (Advanced)
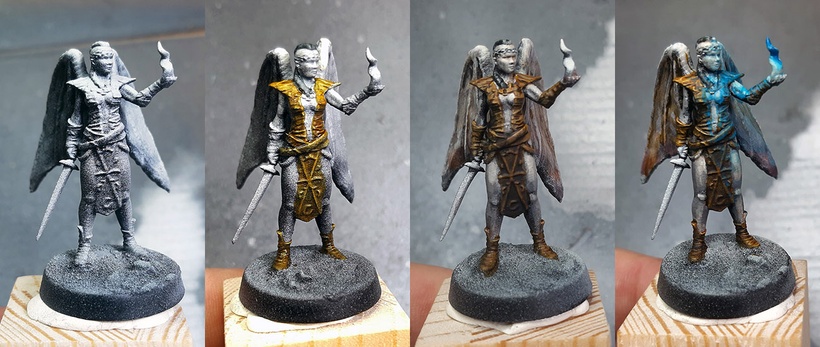
This technique results in a slightly more organic look on the figure but uses several advanced techniques like OSL (object source lighting) despite using some really simple color schemes in certain parts of the mini. You can of course forego these techniques and use something else for the effect you are after. Altogether, this is a much faster method than the second one.
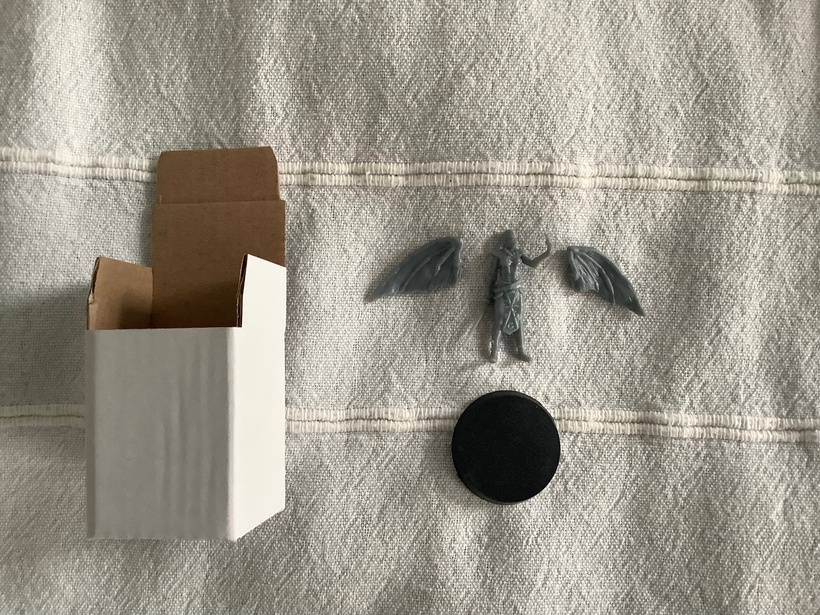
Step 1 - Assembly
We used superglue to glue the wings to Finn’s back as well as to fix her to the base. The assembly guide insert from the box depicts how this should be done. As always with this step, dry-fit parts to make sure how they go together ahead of gluing, because it is easy to mix up the wings. We also recommend holding the wings there for a bit longer so that the glue can set. If the wing fits poorly, you might need to carefully file away at the part that attaches until they do.
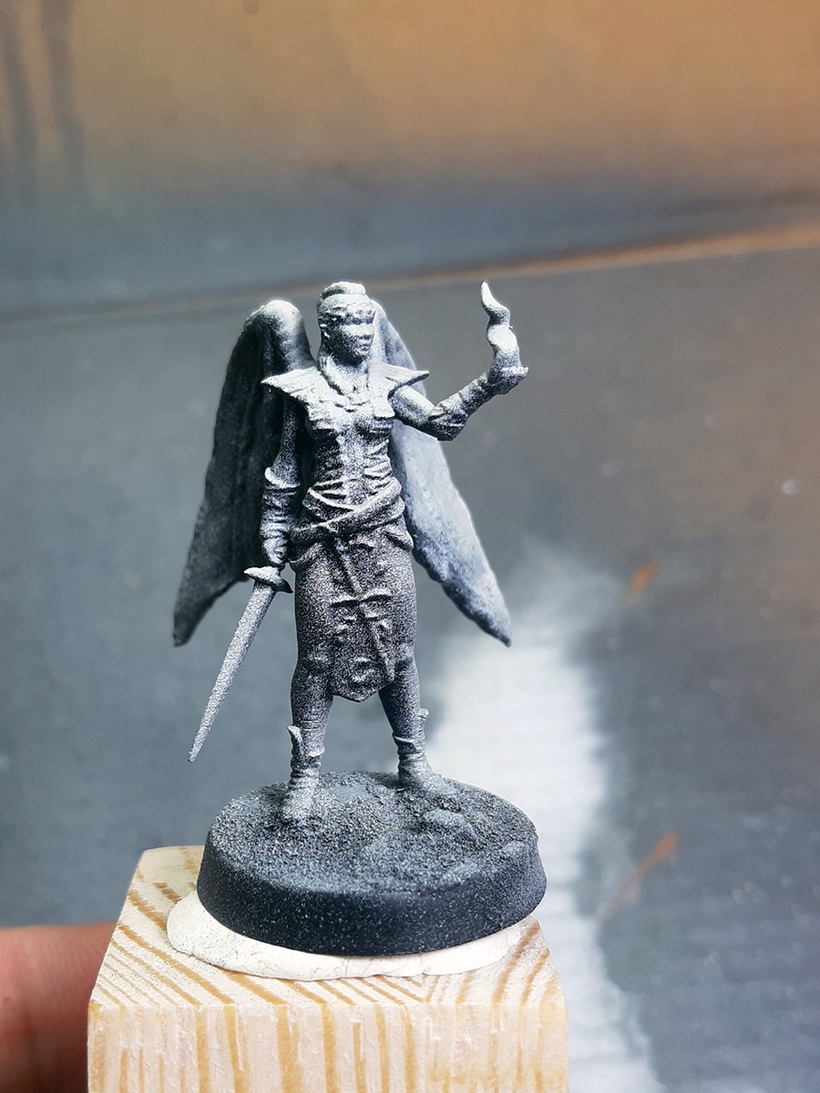
Step 2 - Priming
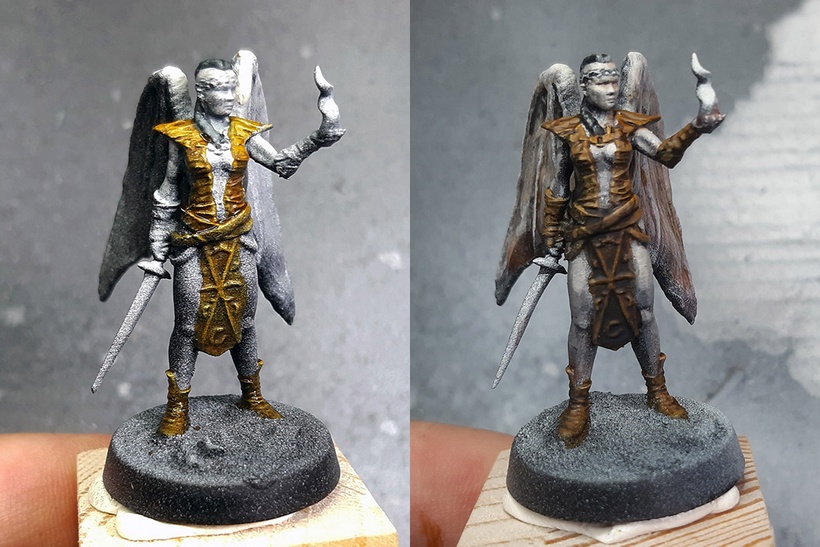
After the glue set, we used Chaos Black spray primer (GW) on the whole mini, then we sprinkled some Grey Seer spray primer (GW) carefully from above and from a 45 degree angle to build up zenithal highlights.
Step 3 - The Skin
The gray-white finish on the mini’s skin was achieved using Abaddon Black (GW), Stormvermin Fur (GW), and Ulthuan Grey (GW), as well as watered down Nuln Oil wash (GW). Various mixes of the grays were used to build up a lighter skin tone, especially on the top part while the washes and the black was used sparingly in the deeper parts and crevices. The legs and the wing frames were painted mostly with the lightest grays.
Step 4 - The Clothes
Snakebite Leather contrast paint (GW) was applied on all the clothing (belts, harness, skirt). Then the patterns and the edges on the upper part were picked out by XV-88 (GW).
Step 5 - The Wings
Guilliman Flesh contrast paint (GW) was applied on the membranes, with some brown washes added on the top part, as well as some freehand lines of light fleshtones used to paint lines to represent veins.
Step 6 - The Hair and the Crown
Finn’s hair was first based with Abaddon Black, then carefully overbrushed with Stormvermin Fur. The crown was also painted with Abaddon Black and highlighted with Ulthuan Grey. The intention was for it to stand out a bit but not to paint it with a metallic paint.
Step 7 - The Metallics
The sword was painted with Silver from Vallejo’s Model Air line, then highlighted with Stormhost Silver (GW) along the edges.
Step 8 - The Dragonflame
The sorcerous flame in Finn’s palm was painted with Ulthuan Grey, then mixes of Ulthuan Grey and Ahriman Blue (GW) in different ratios were used to build up a transition from white-gray at the bottom to full blue at the top of the fire. Then Ahriman Blue was diluted to a heavy glaze consistency and applied everywhere the powerful blue light would hit Finndurarth - the farther the fewer coats were used. Then highlights of Ahriman Blue were used on edges and places where the light would hit hardest to further enhance the OSL effect.
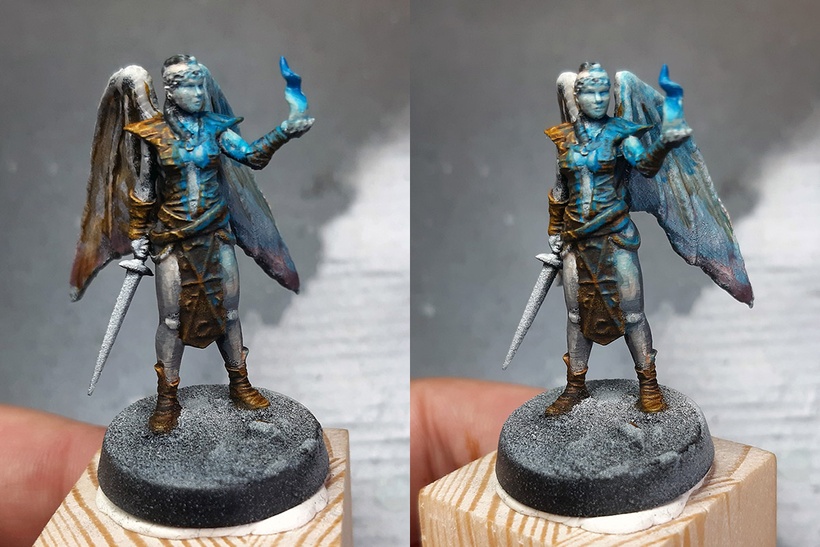
And it is done! For basing and varnishing the mini, see the end of the article.
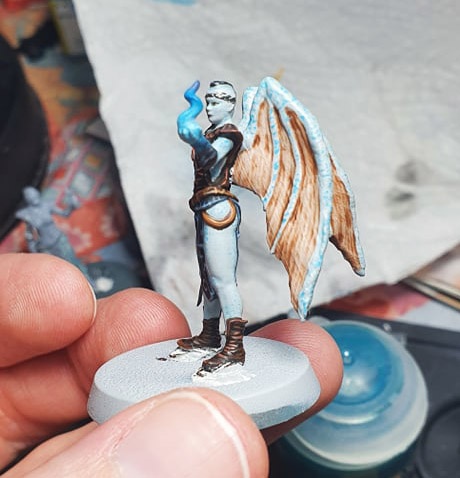
Method 2: Going Sharp (Intermediate)
This method results in a miniature with sharper details. It utilizes fairly standard techniques in the classical “base-wash-layer-highlight” process that you can see in Games Workshop guides. This method is perhaps slower and requires more precise brush handling than the first. As ever, you can alter the recipe as much as you like for your preferred finish.
Step 1 - Assembly
We used the Army Painter superglue to glue the wings to Finn’s back as well as to fix her to the base. The assembly guide insert from the box depicts how this should be done. As always with this step, dry-fit parts to make sure how they go together ahead of gluing, because it is easy to mix up the wings. We also recommend holding the wings there for a bit longer so that the glue can set. If the wing fits poorly, you might need to carefully file away at the part that attaches until they do.
Note that you can paint the wings and the body separately, then glue them carefully. Our painter did so but it is completely up to your preference.
Step 2 - Priming
We used Grey Seer spray primer (GW) on the whole model.
Step 3 - The Skin
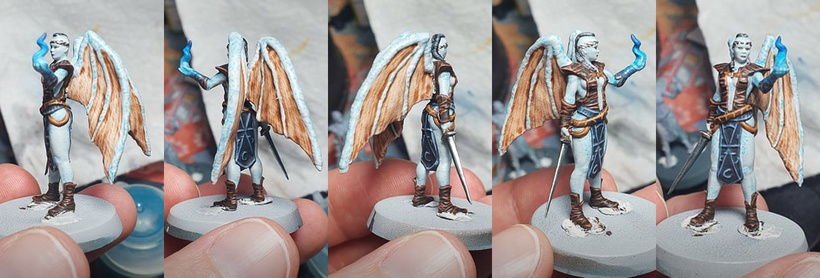
Aethermatic Blue contrast paint (GW) was diluted to a glaze kind of consistency using Contrast Medium (GW) in a 1:4 ratio, then applied liberally on the skin, avoiding pooling. It is important not to use this on the wing membranes at all, only on the wing frames. You can tidy up the wing membranes with Grey Seer if you accidentally go over it here and there. The dots on the skin were added using a thin brush and Macragge Blue (GW) - other mid-blues, like Lothern Blue (GW), are fine as well.
Step 4 - The Hair
Corvus Black (GW) was used first on all the hair, then Dawnstone (GW) to highlight it.
Step 5 - The Clothes
For the upper part of the harness and the boots, we used Mournfang Brown (GW) as a base color, washed it carefully with Agrax Earthshade (GW), then highlighted first with Skrag Brown (GW), and finally with Deathclaw Brown (GW) for a thin edge highlight. The skirt and its belt were painted with Incubi Darkness (GW) first, then highlighted with Thunderhawk Blue (GW) and Fenrisian Grey (GW).
Step 5 - The Wings
Use a diluted Guilliman Flesh (GW) on the wing membranes (2 parts Guilliman with 1 part Medium). We did not highlight them but you can by using Kislev Flesh (GW) carefully.

Step 6 - The Metallics
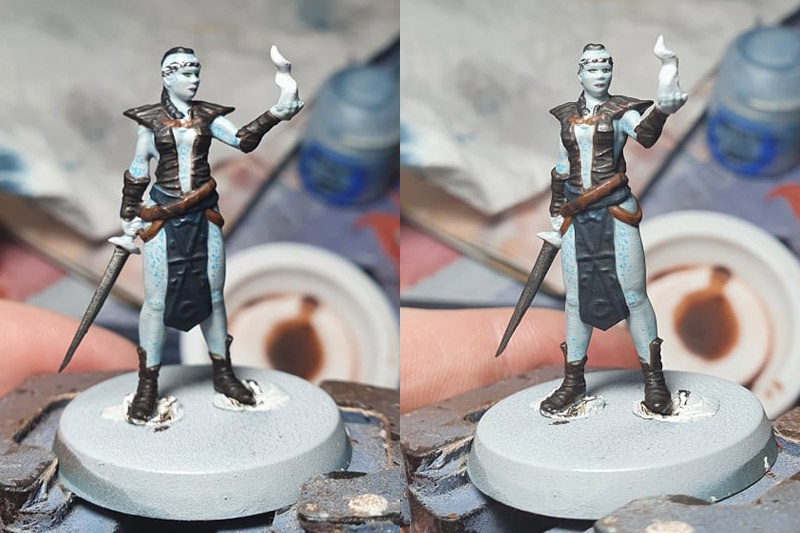
This includes the sword and the crown. We used Leadbelcher (GW) as a base color and highlighted it with Runefang Steel (GW), then a thin edge highlight using Stormhost Silver (GW). For the crown, because it is so tiny, we left out the Runefang Steel. Additionally, if you want to give the sword-blade a simple blue effect that Finn’s Dragonsteel has, you can wash it lightly with Drakenhof Nightshade (GW) after the metal paints are dry.
Step 7 - The Small Details
Then the mouth was carefully painted over with Carroburg Crimson wash (GW) and the eyes were painted with Averland Sunset (GW) first, then a small reptilian pupil (a tiny vertical line) was painted into it using Abaddon Black (GW).
Step 8 - The Dragonflame
The blue Dragonflame in Finn’s hand was base-coated using Lothern Blue (GW). From then on, you can either drybrush or paint Teclis Blue (GW) over the Lothern but only up to two thirds of the flame from the top. Then drybrush or paint Alaitoc Blue (GW) on the top third of the flame. You can use a dark blue drybrush (like Kantor Blue from GW) on the very tips of the flame only. For the light effect, you can use a watered down Lothern Blue to cover parts of Finn’s lower arm but only from above. You can apply several coats, fewer and fewer toward her elbow but more near the flame.
Basing
We went with desert/wasteland themes with our bases and applied yellow-brown colors to bring out the blues used for the minis. Any basing method or material will do as long as you like it. We went with Agrellan Earth (GW) and a heavy drybrushing of Karak Stone (GW), with some brown washes here and there. Let us know what you used! Finally, we painted the rim of the base with several layers of Abaddon Black (GW).
Varnish
Both minis were varnished with the Army Painter’s Anti-shine spray, which is a matt varnish. We used two coats.
And with that the guides are complete, and hopefully so will be your Finndurarth miniatures! Have fun with the painting - we know we will!
- The Lost Pilgrims Team
--------------------------------------------------
If you like Vagrus, please consider sharing our pages and posts with your friends through your favorite social media channel(s). It is much appreciated!
Steam | GoG | Discord | Patreon | Youtube | Twitter | Facebook | Instagram
BUY NOW ON


or follow us on


©2024 Lost Pilgrims Studio